


The aft head formica that came off in 2 inch chips is now being replaced with new white formica. Thank you Bob!


The aft cabin was given a fresh coat of finish.


Compartments and shelves are being scrubbed, scraped and re-painted


The abandoned holes in the bridge dash were something we wanted to address. After careful consideration we decided to overlay the existing fiberglass dash with a piece of powder-coated aluminum. We made a cardboard template, had a friend help us cut the aluminum and sent it off to be powder-coated. Thank you Randy!


The bow pulpit received an overhaul. There is a new stainless steel wrap and reinforcement.


We found replacement faucets for the forward and aft heads.


The swim platform, grab rails and ladder steps are being manufactured out of Plasteak. We decided we did not want to refinish these pieces but want to keep the teak look.


Teak refinishing isn’t just sanding – we needed to use chemical stripper on some of the pieces. We found liberally coating them with chemical stripper and then wrapping them in plastic kept the stripper working longer.


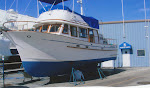
Re-attaching the bridge was our largest project and biggest challenge. We couldn’t have accomplished it without the help of a friend who had done a similar project on his own boat recently. Thank you so very much John!

First we needed clean glass. Everything was sanded and some areas were ground out to clean glass.

Sand, fill, repeat…


We were not only re-attaching the bridge that was removed for shipping but repairing some spots in the brow that appear to have had sanding blemishes from the past.

The ends of the bridge had teak caps but now we’ve glassed them instead.


Primer was the next step.

Varnish stripping continues during the bridge project.


The Sampson post is being re-painted.


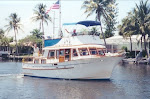
Final coats of white on the bridge! It is looking AMAZING!

Reminder: it came to us in a separate piece on the trailer!

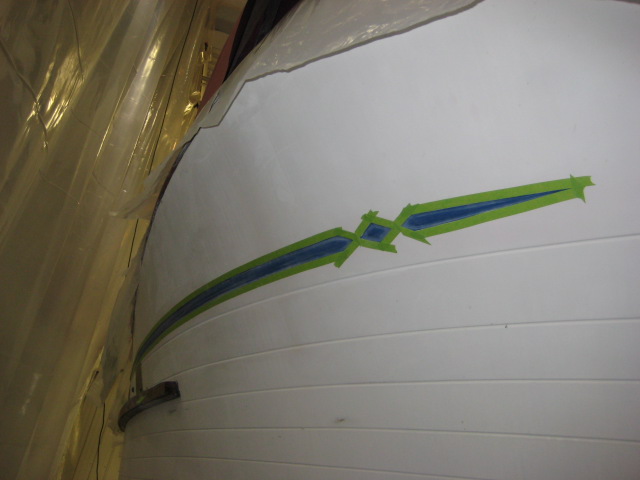
While painting, we’re re-painting the hull stripes – but we’re covering the bright blue with navy.

The navy looks great! And so does our hull. It was wet sanded, buffed and waxed. Thank you Jim!


Coming next is the painting of the non-skid...
Great looking progress. I have a 36DC and was wondering how you got the door removed to refinish it. Both doors of our boat are ugly. I looked at the helm door yesterday for a while and could not figure how that is removed.
ReplyDeleteBrooke Smith YaHaHaTing@gmail.com
I just found your site. My wife and I are restoring our 1979 albin 36 trawler
ReplyDeleteWe have learned a lot, but I haven't stripped the ceiling and wall yet, was good to see your bathroom stripped to raw glass. Please let me know if you have any additional pictures of your restoration. Phil
Good afternoon
DeleteI hope you stir monitor this site. Are renovations are progressing. When you reinstalled the bridge how was it fastened and are the connections accessed from the inside or the out side.
Phil